Designing Login Dialog, Splash Screen and About Us Dialog in Delphi
Generally, when
we open as application secured by User and Password shows a Login dialog to
validate login process. And then after login successfully a screen shows for
some time and closes automatically that’s called as splash screen. Splash
screen is used to show startup process like initial data loading, application
settings loading etc.

A splash screen is a form
that is displayed when an application is first starting to inform the user that
the program is actually doing something even though you cannot see this. Like
connecting to database, creating many forms, etc. The most basic splash screen
is just an image that appears in the center of the screen when the application
is loading and then disappears when it has loaded.


Creating a Login Dialog
If we want to keep our application safe for unauthorized user data entry then we generally validate the users before application start. And for that we use a login dialog which will have options to enter User and Password. If User and Password data matched in login screen then only application will open. Let's see how to create a login dialog for User validation in a few steps:
6. Customize your Login
screen by adding components like labels, edits etc.
You could add Label and Edit components for User and Password.
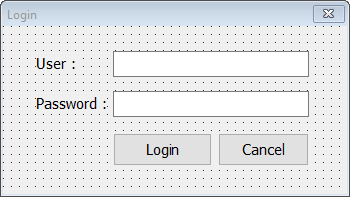
9. I also added a Class function Execute so that we can call the Login dialog from project source file.


So, in this blog
we will see how to design a Login dialog, Splash screen and an About Us dialog for
our application in effective way. Here I have
used Delphi XE5 to create a project which will have a main form, a login form, a
splash screen and a About Us dialog. Initially when we run application Login
dialog will show and after Login Successfully Splash screen will show with
progress bar indicating some process. And after splash screen process completed
main form will load for work. And in main for I have added a menu Help ->
About Us.
So lets create a project file.
Project File
1. Create a
new project and save as Project1
Select “VCL Form Application” option in
File menu from Delphi IDE.
program
Project1;
uses
System.SysUtils,
Vcl.Forms,
Main in 'Main.pas' {frmMain},
{$R
*.res}
begin
Application.MainFormOnTaskbar := True;
Application.CreateForm(TfrmMain,
frmMain);
Application.Run;
end.
Now save main form for the project.
Main Form file
After created
a project it will automatically add UNIT1. So, I used that Unit1 as main form.
1. Change
Form1 name to frmMain and save as Main.pas.
2.
Set Caption property to Main
3. Then add a
Main menu, a Toolbar with some buttons and a Status bar for example.
4. Set
FormStyle property to fsMDIForm
5. Set WindoState
property to wsMaximized
Main form
source code looks like…
unit
Main;
interface
uses
Winapi.Windows, Winapi.Messages,
System.SysUtils, System.Variants, System.Classes, Vcl.Graphics, Vcl.Controls,
Vcl.Forms, Vcl.Dialogs, Vcl.ComCtrls, Vcl.ToolWin, Vcl.Menus;
type
TfrmMain = class(TForm)
MainMenu1: TMainMenu;
File1: TMenuItem;
Exit1: TMenuItem;
ToolBar1: TToolBar;
ToolButton1: TToolButton;
ToolButton2: TToolButton;
ToolButton3: TToolButton;
StatusBar1: TStatusBar;
private
{ Private declarations }
public
{ Public declarations }
end;
var
frmMain: TfrmMain;
implementation
{$R
*.dfm}
end.
Now design a Splash Screen.
What is a Splash Screen?
Why use a Splash Screen?
A Splash Screen adds a professional touch to an
application without adding an excessive amount of work, for shareware programs
it is also a good place to remind users to register the package.
Creating a Splash Screen?
Let's see how to create a
simple start-up splash screen in a few steps:
1.
Add a new form to your project and save as Splash.pas.
Select New Form from
the File menu in the Delphi IDE.
2.
Change the Name Property of the Form to something like frmSplash.
3.
Change Property: BorderStyle to bsNone
4.
Change Property: Position to poScreenCenter
5.
Customize your splash screen by adding components like labels, images,
panels, etc.
You could first add one TPanel component (Align: alClient) and
play around with BevelInner, BevelOuter, BevelWidth, BorderStyle, and BorderWidth properties to produce some eye-candy effects.
6. Select Project from the Options menu
and move the Form from the Auto-create listbox to Available
Forms.
Splash screen source code looks like…
unit
Splash;
interface
uses
Winapi.Windows, Winapi.Messages,
System.SysUtils, System.Variants, System.Classes, Vcl.Graphics, Vcl.Controls,
Vcl.Forms, Vcl.Dialogs, Vcl.ExtCtrls, Vcl.StdCtrls, dxGDIPlusClasses,
Vcl.ComCtrls;
type
TfrmSplash = class(TForm)
Panel1: TPanel;
Label1: TLabel;
Label2: TLabel;
Image1: TImage;
Image2: TImage;
Image3: TImage;
ProgressBar1: TProgressBar;
private
{ Private declarations }
public
{ Public declarations }
end;
var
frmSplash: TfrmSplash;
implementation
{$R
*.dfm}
end.
7. We'll create a form on the fly and then display it before the application is opened. Select Project Source from the View menu or You can also do this
7. We'll create a form on the fly and then display it before the application is opened. Select Project Source from the View menu or You can also do this
through Project
> View Source.
8. Add the following code after the begin statement of the Project Source code (the .DPR file):
Application.Initialize;
frmSplash := TfrmSplash.Create(nil) ;
frmSplash.Show;
frmSplash.Update;
Application.MainFormOnTaskbar := True;
Application.CreateForm(TfrmMain, frmMain);
// sleep for 3 sec. So that we can see the
Splash screen. The same we can use for any process//
while frmSplash.ProgressBar1.Position <
100 do
begin
frmSplash.ProgressBar1.Position :=
frmSplash.ProgressBar1.Position+20;
Sleep(1000);
end;
frmSplash.Hide;
frmSplash.Free;
Application.Run;
That's
it! Now you can run the application to check Splash Screen
If we want to keep our application safe for unauthorized user data entry then we generally validate the users before application start. And for that we use a login dialog which will have options to enter User and Password. If User and Password data matched in login screen then only application will open. Let's see how to create a login dialog for User validation in a few steps:
1.
Add a new form to your project.
Select New Form from the File menu in the Delphi IDE.
Select New Form from the File menu in the Delphi IDE.
2. Change the Name
Property of the Form to frmLogin
and saved as Login.
3.
Set Caption property to Login
4.
Change Property: BorderStyle to bsDialog
5.
Change Property: Position to poScreenCenter
You could add Label and Edit components for User and Password.
7.
Select Project from the Options menu and move
the Form from the Auto-create listbox to Available
Forms.
8.
In Login form we will write code to validate User and Password.
procedure TfrmLogin.btnloginClick(Sender:
TObject);
begin
if (edituser.Text = 'User') and (editPass.Text
= 'Pass') then
ModalResult := mrOK
else
ModalResult := mrCancel
end;
9. I also added a Class function Execute so that we can call the Login dialog from project source file.
class function
TfrmLogin.Execute: boolean;
begin
with TfrmLogin.Create(nil) do
try
Result := ShowModal = mrOk;
finally
Free;
end;
end;
Now
after added all codes Login.pas looks like…
unit Login;
interface
uses
Winapi.Windows, Winapi.Messages,
System.SysUtils, System.Variants, System.Classes, Vcl.Graphics, Vcl.Controls,
Vcl.Forms, Vcl.Dialogs, Vcl.StdCtrls;
type
TfrmLogin = class(TForm)
Label1: TLabel;
Label2: TLabel;
edituser: TEdit;
editpass: TEdit;
btnlogin: TButton;
btncancel: TButton;
procedure btnloginClick(Sender: TObject);
procedure btncancelClick(Sender: TObject);
private
{ Private declarations }
public
{ Public declarations }
class function Execute : boolean;
end;
var
frmLogin: TfrmLogin;
implementation
{$R *.dfm}
procedure
TfrmLogin.btncancelClick(Sender: TObject);
begin
ModalResult := mrCancel;
end;
procedure
TfrmLogin.btnloginClick(Sender: TObject);
begin
if (edituser.Text = 'User') and (editPass.Text
= 'Pass') then
ModalResult := mrOK
else
ModalResult := mrCancel
end;
class function
TfrmLogin.Execute: boolean;
begin
with TfrmLogin.Create(nil) do
try
Result := ShowModal = mrOk;
finally
Free;
end;
end;
end.
10. Select Project Source from
the View menu or You can also do this through Project
> View Source.
Change
the project source code after the begin
statement of the Project Source code (the .DPR file) as follow:
if
TfrmLogin.Execute then
begin
Application.Initialize;
frmSplash := TfrmSplash.Create(nil) ;
frmSplash.Show;
frmSplash.Update;
Application.MainFormOnTaskbar := True;
Application.CreateForm(TfrmMain, frmMain);
// sleep for 3 sec. So that we can see the
Splash screen. The same we can use for any process//
while frmSplash.ProgressBar1.Position <
100 do
begin
frmSplash.ProgressBar1.Position :=
frmSplash.ProgressBar1.Position+20;
Sleep(1000);
end;
frmSplash.Hide;
frmSplash.Free;
Application.Run;
end
else
begin
Application.MessageBox('You are not
authorized. Wrong User and Password.', 'Login Failed')
end;
That's it! Now you can run the application to check Login
Screen.
And after all
coding Project source code looks like…
program
Project1;
uses
System.SysUtils,
Vcl.Forms,
Main in 'Main.pas' {frmMain},
Splash in 'Splash.pas' {frmSplash},
Login in 'Login.pas' {frmLogin};
{$R
*.res}
begin
if TfrmLogin.Execute then
begin
Application.Initialize;
frmSplash := TfrmSplash.Create(nil) ;
frmSplash.Show;
frmSplash.Update;
Application.MainFormOnTaskbar := True;
Application.CreateForm(TfrmMain, frmMain);
// sleep for 3 sec. So that we can see the
Splash screen. The same we can use for any process//
while frmSplash.ProgressBar1.Position <
100 do
begin
frmSplash.ProgressBar1.Position :=
frmSplash.ProgressBar1.Position+20;
Sleep(1000);
end;
frmSplash.Hide;
frmSplash.Free;
Application.Run;
end
else
begin
Application.MessageBox('You are not
authorized. Wrong User and Password.', 'Login Failed')
end;
end.
'About Us' Dialog
'About Us' dialog is generally used to show information about
our product details like Name, Version, License and Legal Copy Rights with
Company Logos. So here let’s see how to create a 'About Us' dialog.
Creating a About Us dialog?
1.
Add a new form to your project and save as AboutBox.pas.
Select New Form from
the File menu in the Delphi IDE.
2.
Change the Name Property of the Form to something like frmAboutBox.
3.
Change Property: BorderStyle to bsDialog
4.
Change Property: Position to poScreenCenter
5.
Customize your ‘About Us’ dialog screen by adding components like labels,
images, panels, linklabels, buttons and memos etc.
You could first add a TImage component and set company Image. Then add one TPanel component
(Align: alClient) and play around with BevelInner, BevelOuter, BevelWidth, BorderStyle, and BorderWidth properties to produce some eye-candy effects.
6. Select Project from the Options menu
and move the Form from the Auto-create listbox to Available
Forms.
7. Here I have also added a procedure to get Application
version information's.
AboutBox screen source code looks like…
unit
About;
interface
uses
WinApi.Windows, System.SysUtils, System.Classes, Vcl.Graphics,
Vcl.Forms, Vcl.Controls, Vcl.StdCtrls,
Vcl.Buttons, Vcl.ExtCtrls,
dxGDIPlusClasses, Math;
type
TfrmAboutBox = class(TForm)
ProgramIcon: TImage;
Panel2: TPanel;
Panel1: TPanel;
lblProductName: TLabel;
lblVersion: TLabel;
Copyright: TLabel;
InstallNote: TLabel;
OKButton: TButton;
memoCopyRight: TMemo;
Panel3: TPanel;
lblLicensedto: TLabel;
lblInstalledOn: TLabel;
lblWindowsVersion: TLabel;
lblAvailmemory: TLabel;
lblLicenseType: TLabel;
LinkLabel1: TLinkLabel;
procedure FormCreate(Sender: TObject);
procedure LinkLabel1LinkClick(Sender:
TObject; const Link: string;
LinkType: TSysLinkType);
private
{ Private declarations }
function FileDescription: String;
function LegalCopyright: String;
function DateOfRelease: String; //
Proprietary
function ProductVersion: String;
function FileVersion: String;
public
{ Public declarations }
end;
var
frmAboutBox: TfrmAboutBox;
implementation
uses
ShellApi ;
{$R
*.dfm}
function
GetAvailMemorySize(): string;
var
memory: TMemoryStatusEx;
begin
memory.dwLength := SizeOf(memory);
GlobalMemoryStatusEx(memory);
Result :=IntToStr(memory.ullAvailPhys div
1024) + ' KB of '+IntToStr(memory.ullTotalPhys div 1024) + ' KB';
end;
function
GetVersionInfo(AIdent: String): String;
type
TLang = packed record
Lng, Page: WORD;
end;
TLangs = array [0 .. 10000] of TLang;
PLangs = ^TLangs;
var
BLngs: PLangs;
BLngsCnt: Cardinal;
BLangId: String;
RM: TMemoryStream;
RS: TResourceStream;
BP: PChar;
BL: Cardinal;
BId: String;
begin
// Assume error
Result := '';
RM := TMemoryStream.Create;
try
// Load the version resource into memory
RS :=
TResourceStream.CreateFromID(HInstance, 1, RT_VERSION);
try
RM.CopyFrom(RS, RS.Size);
finally
FreeAndNil(RS);
end;
// Extract the translations list
if not VerQueryValue(RM.Memory,
'\\VarFileInfo\\Translation', Pointer(BLngs), BL) then
Exit; // Failed to parse the translations
table
BLngsCnt := BL div sizeof(TLang);
if BLngsCnt <= 0 then
Exit; // No translations available
// Use the first translation from the table
(in most cases will be OK)
with BLngs[0] do
BLangId := IntToHex(Lng, 4) +
IntToHex(Page, 4);
// Extract field by parameter
BId := '\\StringFileInfo\\' + BLangId +
'\\' + AIdent;
if not VerQueryValue(RM.Memory, PChar(BId),
Pointer(BP), BL) then
Exit; // No such field
// Prepare result
Result := BP;
finally
FreeAndNil(RM);
end;
end;
function
TfrmAboutBox.DateOfRelease: String;
begin
Result := GetVersionInfo('DateOfRelease');
end;
function
TfrmAboutBox.FileDescription: String;
begin
Result := GetVersionInfo('FileDescription');
end;
function
TfrmAboutBox.FileVersion: String;
begin
Result := GetVersionInfo('FileVersion');
end;
function
TfrmAboutBox.LegalCopyright: String;
begin
Result := GetVersionInfo('LegalCopyright');
end;
procedure
TfrmAboutBox.LinkLabel1LinkClick(Sender: TObject; const Link: string;
LinkType: TSysLinkType);
begin
ShellExecute(Handle, 'open', PChar(Link),
nil, nil, SW_SHOW);
end;
function
TfrmAboutBox.ProductVersion: String;
begin
Result := GetVersionInfo('ProductVersion');
end;
procedure
TfrmAboutBox.FormCreate(Sender: TObject);
begin
lblProductName.Caption := FileDescription;
lblVersion.Caption := FileVersion;
lblLicensedto.Caption :=
lblLicensedto.Caption + 'XYZ Industries';
lblLicenseType.Caption :=
lblLicenseType.Caption + '5 users';
lblInstalledOn.Caption :=
lblInstalledOn.Caption + '30-06-2018';
lblWindowsVersion.Caption :=
lblWindowsVersion.Caption + TOSVersion.Name;//'Windows 10';
lblAvailmemory.Caption :=
lblAvailmemory.Caption + GetAvailMemorySize;
memoCopyRight.Lines.Text := LegalCopyright;
end;
end.
8. Then add a Help menu in main form and again added
About menu under Help menu of main form. And add AboutBox unit in main form’s Uses
clause.
9. Add the following code on About menu click event in
main form.
procedure
TfrmMain.About1Click(Sender: TObject);
begin
frmAboutBox := TfrmAboutBox.Create(Self);
frmAboutBox.ShowModal;
frmAboutBox.Free;
end;
10. Set following version information details in
Application Options settings to get proper version details. Project menu ->
Options -> VersionInfo


good
ReplyDeleteDesigning Login Dialog, Splash Screen And About Us Dialog In Delphi >>>>> Download Now
Delete>>>>> Download Full
Designing Login Dialog, Splash Screen And About Us Dialog In Delphi >>>>> Download LINK
>>>>> Download Now
Designing Login Dialog, Splash Screen And About Us Dialog In Delphi >>>>> Download Full
>>>>> Download LINK jg
when i paste your code after clicking the "view source" (the splash screen part of ur blog) .. and i run the application i get this error : Undeclared identifier :'Sleep'
ReplyDeleteAdd "SysUtils" to your uses clause.
DeleteDesigning Login Dialog, Splash Screen And About Us Dialog In Delphi >>>>> Download Now
ReplyDelete>>>>> Download Full
Designing Login Dialog, Splash Screen And About Us Dialog In Delphi >>>>> Download LINK
>>>>> Download Now
Designing Login Dialog, Splash Screen And About Us Dialog In Delphi >>>>> Download Full
>>>>> Download LINK Jg